
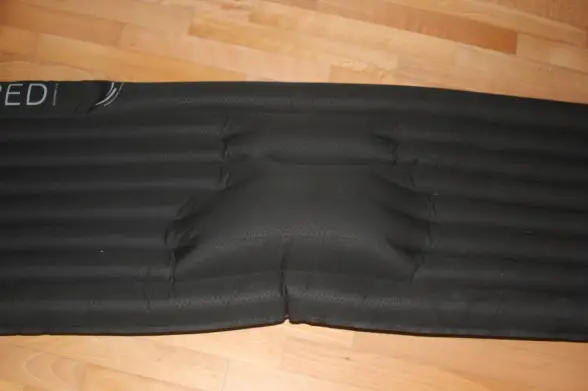
Noticing that your air mattress has developed a bubble is certainly cause for alarm. Most air mattress owners see this as the beginning of the end, signaling that it’s time to search for a new air mattress.
Sure, you may decide you don’t want to go through the hassle of repairing the bubble and would rather buy a new airbed. However, if you’ve decided you want to fix the problem at home, you’ve come to the right place.
If you understand the underlying causes of air mattress bubbles, you can easily fix your air mattress by following these simple steps.
What Causes an Air Mattress Bubble?
So, how does an air mattress develop a bubble?
Several causes can lead to the formation of an air mattress bubble. Let’s look at a few of the most common causes so you can easily identify and solve the issue with your airbed.
Poor Factory Bonding
If a brand-new mattress starts developing a bulge after only a few uses… well, that’s not a good sign. There is a high probability that something went wrong during the air bed manufacturing process.
Poor factory bonding along the seams of the mattress is a major cause of bulges in new mattresses. Because the seams of air mattresses are extremely delicate, it is easy for issues to arise during the manufacturing process.
If your warranty is still valid, it is recommended that you return your air mattress as soon as possible to get a replacement.
Over-Inflation of the Mattress
Frequently over-inflating your air mattress is one of the leading causes of bubble formation.
Remember, airbed seams are not very strong, so regularly forcing too much air into your mattress can easily cause bubbles because of the pressure on the seams.
However, rarely over-inflating your airbed shouldn’t cause too many problems.
But beware: if over-inflation becomes a habit, you should expect to go through airbeds much faster than the average consumer.
Exceeding the Weight Capacity

Almost every airbed has a maximum-weight-capacity label to help you avoid straining your mattress. Please pay attention to the given figure, and make sure you don’t exceed it.
Packing too much weight onto your inflatable mattress can cause punctures and other forms of strain on the material of the mattress.
These strains could lead to damage of the internal seams, increasing the risk of bubble formation throughout the entire mattress.
Natural Wear and Tear
While regular mattresses can last up to 20 years, even the best airbeds are built only to withstand about 1-2 years of constant use.
If you have been using your inflatable mattress for a considerable amount of time, don’t be alarmed if you begin to notice bubbles.
Airbed seams naturally wear out over time, so you may want to consider patching your airbed or replacing it altogether.
Low-Quality Air Mattresses
Without a doubt, there are a lot of bad air mattresses out there. The air mattress that looks like an amazing deal at the discount store will not last very long.
Instead of falling for these fake deals, purchasing your air mattress from somewhere with readily available reviews is recommended.
Your final air mattress decision is very important. Instead of choosing the cheapest option, consider looking at our excellent raised air mattresses reviews.
How to Fix a Bubble in Your Air Mattress
Bubbles in your mattress don’t necessarily mean you have to purchase a new airbed. In most cases, the problem can be easily fixed at home. Here are some easy steps to follow.
1. Prepare Your Mattress
Preparing your mattress is the first step toward fixing an air mattress bubble. Start by removing any sheets, mattress pads, pillows, or other loose items which may have been left on the mattress.
Trying to locate a bubble while the mattress is covered in sheets or other items can make the task more difficult.
Large bubbles are quite conspicuous and should be easily found. However, you may have to spend some time searching for any smaller bubbles throughout the mattress.
If your mattress has an electric internal pump, unplugging it from the electrical outlet is recommended.
After successfully locating the bubble and unplugging the air mattress if necessary, it is time to move on to the next step.
2. Begin Deflating the Air Mattress
Attempting to fix an air mattress bubble while the bed is fully inflated makes the task much more difficult than need be.
If your mattress has a stand-alone pump, open the nozzle to release air, and roll up the mattress to force the air out. If your air mattress has a built-in pump, press the deflate dial.
Do not deflate the mattress entirely before moving on to the next step!
3. During Deflation, Apply Pressure to the Bubble
It is important to apply pressure to the bubble as the air mattress is actively deflating, regardless of which type of mattress you own.
Applying gentle pressure to the bubble usually results in the bubble successfully popping before the mattress is fully deflated.
4. Re-Inflate Your Mattress
Once you have gotten rid of the bubble, re-inflating your air mattress is the final step. If your mattress is not electric, attach your air mattress pump to the nozzle to inflate your mattress.
Remember to be careful to avoid over-inflating your mattress. Stop inflating once the mattress reaches a suitable level of firmness, and check for any remaining bubbles, repeating Steps 2-4 as necessary.
Replacement Recommendations
Getting rid of a bubble in an air mattress is difficult, and it doesn’t always work. Here are our recommendations for air mattresses that are worth considering as a replacement.
These are extremely well-reviewed and will stand the test of time.
- SoundAsleep Dream Series Air Mattress
- Great premium air mattress
- Sable Air Mattresses Queen Size Inflatable Air Bed
- Great mid-range air mattress
- Intex Comfort Plush Dura-Beam Airbed
- Great budget air mattress
The Verdict
Bubbles in your inflatable mattress are frustrating, and it can be overwhelming trying to tackle this problem. However, fear not! Bubbles in your airbed should not necessarily mean the end has come.
Just follow our simple instructions, and you will be amazed at how easily a seemingly worn-out air mattress can be transformed.